Reference
Pinout & hardware
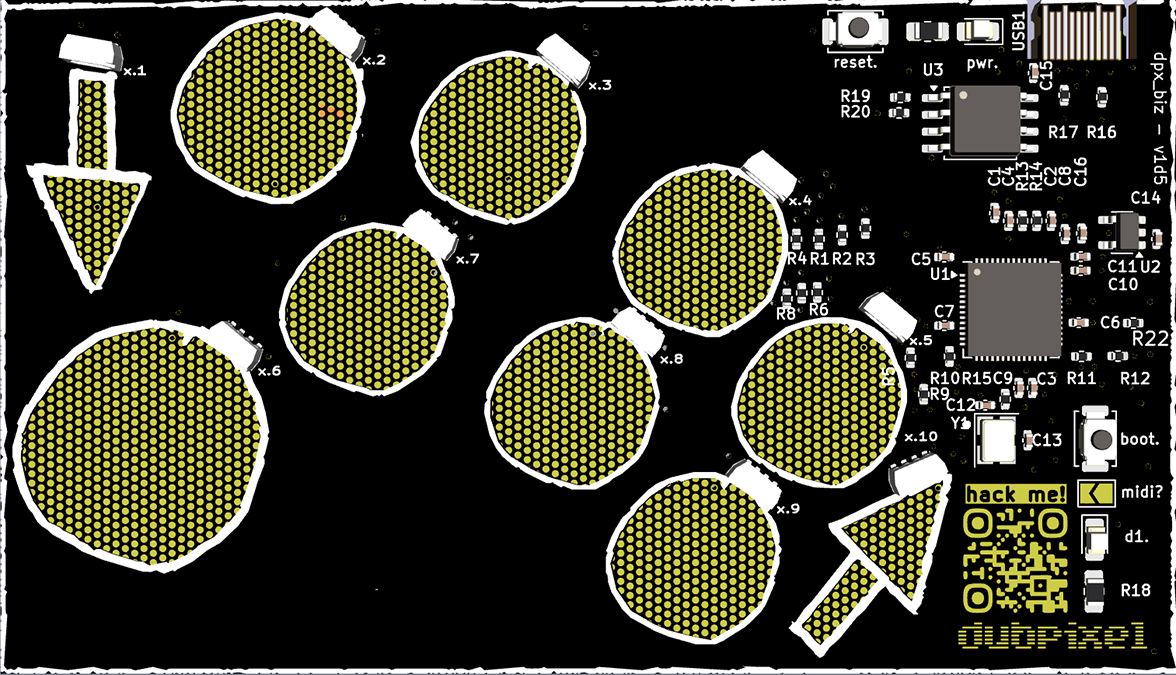
Hover a pad on the board to see its GPIO, LED index, and what the two demos send when you touch it.
0
pad 0 · x.1
gpio3
led0
midinote 60
hidctrl+alt+↑
d3layer up
1
pad 1 · x.2
gpio2
led1
midinote 61
hidalt+s
d3split section
2
pad 2 · x.3
gpio1
led2
midinote 62
hidalt+m
d3merge section
3
pad 3 · x.4
gpio4
led3
midinote 63
hidctrl+alt+[
d3trim to playhead
4
pad 4 · x.5
gpio9
led4
midinote 64
hido
d3end of container
5
pad 5 · x.6
gpio7
led9
midinote 65
hid.
d3next section
6
pad 6 · x.7
gpio6
led8
midinote 66
hid,
d3previous section
7
pad 7 · x.8
gpio5
led7
midinote 67
hidalt+t
d3repeat prev tag
8
pad 8 · x.9
gpio10
led6
midinote 68
hidspace
d3play section
9
pad 9 · x.10
gpio11
led5
midinote 69
hidctrl+alt+↓
d3layer down
B
SW1 · boot
pressreset/reboot
R
SW2 · reset
hold at power-upbootloader
D1
D1 · status LED
blinkheartbeat
USB
USB-C port
notetop edge, right side
10
pad 10 · no LED
noteon the QR code
11
pad 11 · no LED
noteon the dubpixel logo
hover / tap a marker // numbers match the pad index used in the firmware (0-indexed)
| pad | silk | gpio | led | midi | hid | d3 function |
|---|---|---|---|---|---|---|
| 0 | x.1 | 3 | 0 | 60 | ctrl+alt+↑ | layer up |
| 1 | x.2 | 2 | 1 | 61 | alt+s | split section |
| 2 | x.3 | 1 | 2 | 62 | alt+m | merge section |
| 3 | x.4 | 4 | 3 | 63 | ctrl+alt+[ | trim to playhead |
| 4 | x.5 | 9 | 4 | 64 | o | end of container |
| 5 | x.6 | 7 | 9 | 65 | . | next section |
| 6 | x.7 | 6 | 8 | 66 | , | previous section |
| 7 | x.8 | 5 | 7 | 67 | alt+t | repeat prev tag |
| 8 | x.9 | 10 | 6 | 68 | space | play section |
| 9 | x.10 | 11 | 5 | 69 | ctrl+alt+↓ | layer down |
| 10 | - | 18 | none | 70 | esc | escape |
| 11 | - | 19 | none | 71 | tab | tab |
The HID demo ships the same shortcuts the production firmware uses for
disguise d3 designer //
layer and section navigation for show control.
Pads 10 & 11 aren't silkscreened with a number and have no LED beneath them, so
they're left off the board diagram // both sit along the bottom edge near center.
Other pins: WS2812 data → GPIO 0 ·
onboard status LED (D1) → GPIO 25.